In a planted aquarium, CO2 (Carbon Dioxide) is arguably the most critical factor. All aquatic plants need it for respiration and growth, and it is used in a process called photosynthesis. Plants need a steady supply of CO2 during daylight hours, or they will suffer. CO2 is combined with water and light energy to create oxygen and sugars, which allows them to continue growing.
Where does CO2 come from?
In the wild CO2 is obtained in large amounts from the substrate (mud) and degrading plant matter throughout the course of the year. In an enclosed aquarium however, CO2 is extremely limited. Compared to the wild, tap water is void of CO2, and plant decay in an aquarium is minimal. This is why many aquarists have discovered that manually adding CO2 to their plants helps them grow much better and stronger.
Whether or not you need CO2 injection and how much you need is determined by the amount of light you provide and the plants you want to grow. However, injecting CO2 is always recommended for a more successful planted aquarium.
CO2 is not often needed in low-light aquariums. Because plants are less stimulated to grow in low light, extra CO2 injection is unnecessary because there is already enough CO2 supply from water surface agitation, fish respiration, and the gradual organic breakdown of dead plant matter. However, adding CO2 to a low-light tank can still increase the efficiency of your plant's growth and health.
CO2 injection is essential in aquariums with medium to high lighting. Aquatic plants grow better when there is more light available to them. As a result, the plants' demand for CO2 increases. This is when an aquarium becomes CO2 restricted: in the medium to high light range. To satisfy the plants needs, the aquarist must now begin adding CO2. Your plants will suffer from growth deficiencies if CO2 levels in the aquarium remain low, and algae will form as a result.
What you'll need to get started injecting CO2
1. CO2 bottle
CO2 bottles are available in a variety of sizes. The bigger the bottle, the longer it will keep you going. Filling a giant bottle is often more cost-effective, saving you money in the long run. Make sure to buy a bottle with a standard fitting for the country you reside in. They're easy to come by and are possibly better obtained locally. CO2 bottles are also available in two sizes and can be bought in-store.
2. CO2 Regulator
Carbon Dioxide is first introduced using a CO2 regulator. The bottle's pressure is transferred to a lower, more functional pressure by the regulator. Try going for a simple single gauge regulator that can change the rate of CO2 discharge through the needle valve.
3. Solenoid and timer
We're huge fans of solenoids. They help you save money while still reducing CO2 emissions. Since your plants are not photosynthesizing during the "lights-off" hours, they do not need CO2. As a result, we will be able to switch off the CO2 supply. This can be accomplished manually by simply turning off the bottle's CO2 supply. However, in a typical household, no one is always available at the right time to do this! The CO2 will be switched off when you decide to use a solenoid valve and a timer. This is a beautiful piece of equipment. Any digital/electronic 24-hour timer from a nearby DIY store will suffice.
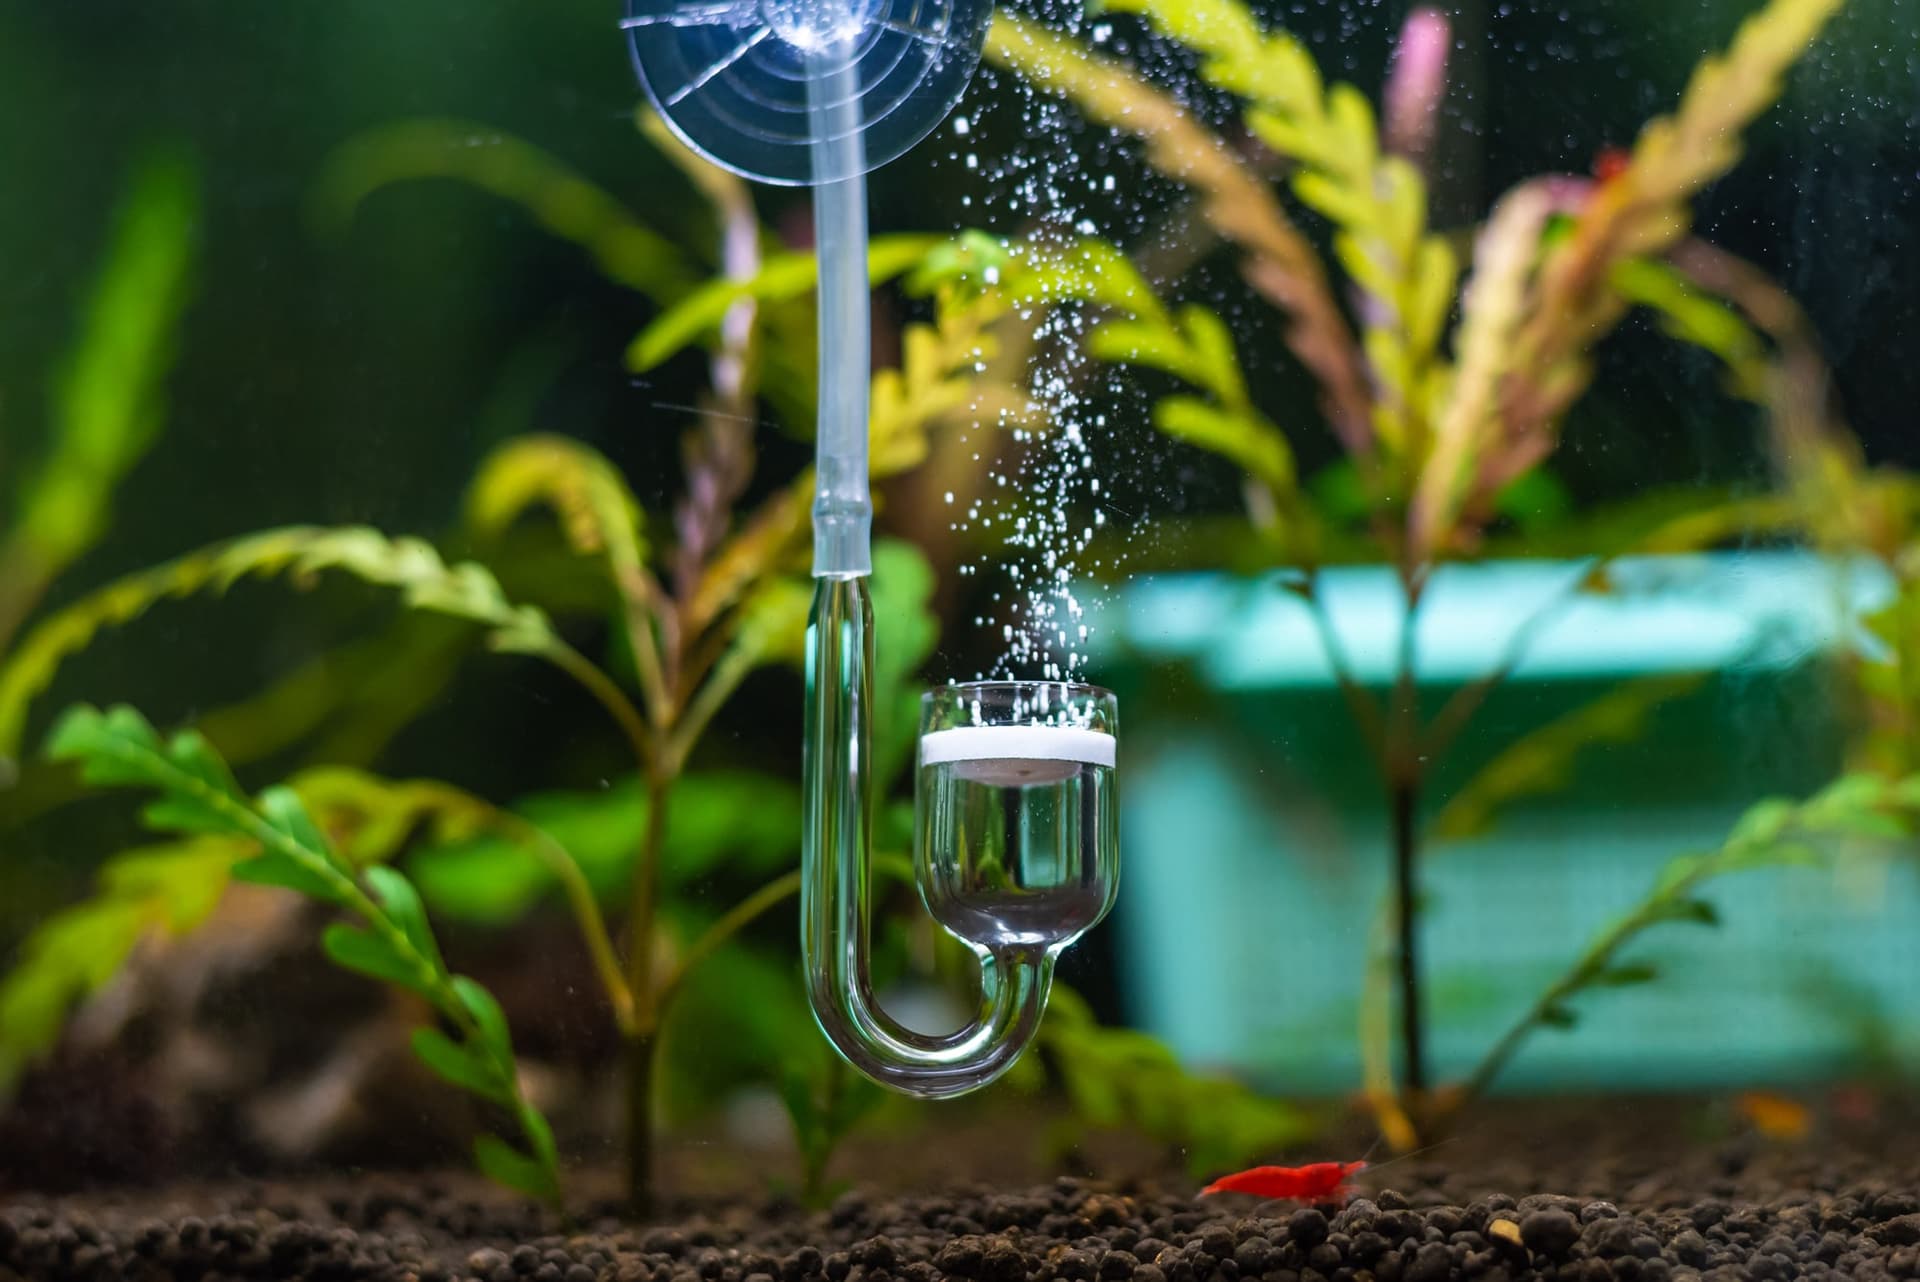
4. Bubble Counter
A bubble counter helps you keep track of how much CO2 is getting into your aquarium. It's a different piece of equipment that goes in line with your filter tubing. You can use the bubble counter to count the number of bubbles entering your aquarium one by one when changing your regulator. Counting the bubbles per second is the most straightforward way to determine this. Reduce the number of bubbles per second in your aquarium if you need to reduce the amount of CO2.
5. Diffuser
A diffuser enables CO2 to reach the aquarium more efficiently. CO2 is forced into a porous medium, which breaks it down into a fine mist of bubbles. The water in your tank will then absorb these bubbles at an increased rate. Your diffuser should be on the opposite side of your outlet flow. The bubbles would be pushed downwards by the flow from your filter, allowing for higher diffusion rates.
6. Tubing
To attach your regulator to your diffuser, you'll need tubing. The tubing must be suitable for CO2 use. CO2-resistant tubing is better than standard airline tubing because it has suitable properties.
7. Drop Checker
Another piece of equipment used to calculate the volume of CO2 diffused into your water is the drop checker. It's a small bottle that contains a special indicator liquid that changes color based on the amount of CO2 in your aquarium's water. Blue denotes inadequate CO2, yellow denotes excessive CO2, and green denotes the correct number. Plants thrive best at a concentration of about 30 parts per million (ppm) underwater. This is a safe amount for your fish as well. You endanger your fish if you release too much CO2. If there isn't enough CO2, plants will not be able to grow correctly. Look for green when changing the CO2 rate with your needle valve and bubble counter.
How to put it together?
When you know how putting your CO2 equipment together is a breeze! You'll get your CO2 system up and running in no time.
Tighten the regulator to the CO2 bottle with a spanner. When releasing the gas from the bottle, open the needle valve on your regulator slightly until everything is connected. When you first open the primary valve on your bottle, this will prevent damage to the solenoid. After that, open the bottle's main valve to let the CO2 out. If the bottle is completed, the left gauge on the regulator can switch to about 800-1000psi.
To free CO2 from your regulator, slowly turn the needle valve about half a turn and look through your bubble counter for CO2 bubbles. Look for about 1-2 bubbles per second coming through your bubble counter using the needle valve once more (a higher rate may be required in larger aquariums). Since the needle valve is so responsive, only slight movements are needed to adjust the CO2 flow rate. Use your drop checker to track your CO2 levels over the next few hours. Make any necessary changes before your drop checker fluid turns orange. Note that the drop checker takes about an hour to react to CO2 levels. Consequently, when you check your drop checker, it will display the amount 1 hour ago.
The solenoid can be programmed to turn off the CO2 at night using an electric plug timer. Electric plug timers can be found in most supermarkets and DIY shops. When the solenoid valve is turned on, it will open, and when it is turned off, it will shut.
Top Tip: One hour before the lights go out, switch off your CO2. During the last hour of your photocycle, there will be enough CO2 in your aquarium for your plants. This would reduce CO2 emissions.